Who says ghosts can’t be chic? This spooky season, add a touch of eerie enchantment to your home with easy-to-follow instructions for DIY chicken wire ghosts. We’ll show you how to transform humble chicken wire and simple materials into captivating spectral creations that will leave your guests spellbound.
Chicken Wire Ghosts: Your New Favorite Spooky DIY
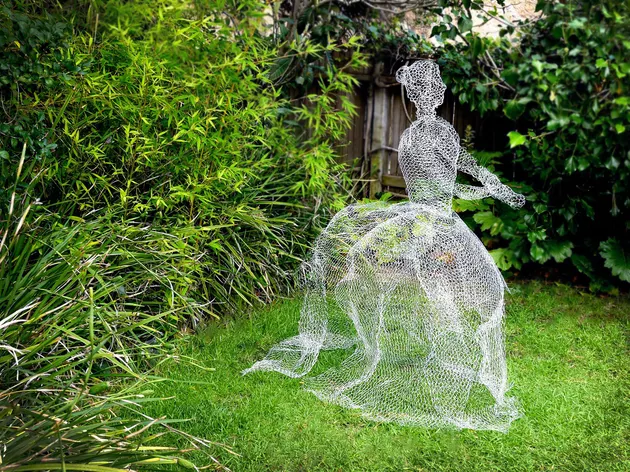
Halloween decorations are expensive, but crafting eerie, unique decorations doesn’t need to break the bank. Enter: chicken wire ghosts. These ghostly figures are popping up everywhere, and for good reason. These DIY specters, made with chicken wire and draped with fabric, create a classic, ethereal look. When the breeze catches the fabric, they sway and dance in a way that store-bought decorations just can’t match.
Why Everyone’s Going Cuckoo for Chicken Wire Ghosts
Crafting these eerie figures is surprisingly simple and affordable. The basic materials are probably already in your garage or available at any hardware store. But the real magic lies in the endless possibilities for customization. You’re the artist here! Sculpt your ghosts into any shape or size, give them creepy poses, or even create a whole ghostly gathering. The only limit is your imagination.
Let’s Get Crafting: Your Step-by-Step Guide
Ready to try your hand at making your own chicken wire ghost? It’s easier than you might think! Here’s what you’ll need:
Gather Your Ghostbusting Supplies:
- Chicken wire: The star of the show! For most ghosts, you’ll need a 25-foot roll that’s 36-inches wide.
- Wire cutters: These are essential for snipping and shaping the chicken wire.
- Protective gloves: Chicken wire can be a bit scratchy, so protect those hands.
- Tomato cage (optional): This can act as a ready-made base for your ghost’s body.
- Foam mannequin head (optional): This gives you a head start on shaping, but feel free to sculpt your own!
- Black spray paint: This will give your ghost that classic, shadowy look.
- Cheesecloth or similar lightweight fabric: This creates the drapey, ethereal effect. You’ll need 2-3 yards for a basic ghost.
- Lighting elements (optional): Think string lights, LEDs, or even glow sticks for an extra spooky glow.
Time to Build Your Boo-tiful Creation:
- Shape the Head (and Maybe a Body Too): If you’re using a foam head, great! If not, don’t sweat it. Just mold some chicken wire into a head shape. Feel free to get creative! You can make it round, oval, or even go for a more abstract, creepy vibe. For the body, you can use a tomato cage for a classic, flowing shape, or create your own form with chicken wire. Use zip ties or wire to secure the head and body together.
- Arms? Don’t Be Afraid to Experiment: Want your ghost to have outstretched arms? Maybe a menacing claw? Go for it! Bend some chicken wire into the desired arm shapes and attach them to the body.
- Drape It Like It’s Haunt Couture: Now for the fun part! Drape your cheesecloth (or similar fabric) loosely over the frame. You want to create a flowing, ethereal effect, so don’t be afraid to use multiple layers and let it bunch up in places. Secure the fabric with safety pins or a few stitches.
- Final Touches for Maximum Spook Factor: Once you’re satisfied with the draping, take your creation outside (or to a well-ventilated area) and give it a good coat of black spray paint. This will help unify the look and create a more ghostly silhouette. Finally, add your lighting elements if you’re using them. You can place lights inside the head for an eerie glow, wrap them around the body, or even place them at the base to create spooky shadows.
Going Beyond the Basics:
The beauty of chicken wire ghosts is that they’re endlessly customizable. Here are a few ideas to spark your creativity:
- Lighting Wizardry: Experiment with different lighting techniques! Try internal lights for an eerie glow, or place your ghost strategically to cast spooky shadows.
- Strike a Pose: Don’t be afraid to get creative with your ghost’s posture! Bend the arms, tilt the head, or even create a dynamic, windblown pose.
- Prop It Up!: Add props for extra personality! Give your ghost a spooky lantern, drape them in chains, or even create a ghostly graveyard scene around them.
- Year-Round Fun: Don’t limit yourself to Halloween! With a little creative tweaking, you can adapt chicken wire ghosts for other holidays and themes. Think whimsical for Christmas, spooky for Halloween, or even elegant for a gothic wedding!
- Join the Ghostly Community: Share your creations online and connect with other chicken wire ghost enthusiasts for inspiration and tips!
Remember, there’s no right or wrong way to create a chicken wire ghost. It’s all about letting your creativity run wild! So grab some supplies, unleash your inner artist, and get ready to make this Halloween the spookiest one yet.
How Much Chicken Wire for a Ghost?
So you want to make a spooky chicken wire ghost for Halloween? Awesome! Now, before you go haunting the hardware store, let’s figure out how much chicken wire you’ll actually need.
Think of it like this: a big, imposing ghost will need more “skin” than a little, floaty one, right? The more elaborate your ghost’s pose, the more chicken wire you’ll need to bring your vision to life.
How Much Wire, You Ask?
It’s tough to give you an exact number without knowing your ghost’s measurements, but here’s a handy starting point. Most chicken wire comes in 25-foot rolls that are 36 inches wide.
- For a ghost standing around 4 feet tall: You’ll probably need about half to a full roll of chicken wire.
- Going bigger? Get ready to stock up on more wire!
Building Your Ghostly Blueprint:
Here’s a simple breakdown to help you estimate:
- Head: Picture a head about the size of a basketball (around 12 inches across). You’re looking at roughly 3-4 square feet of chicken wire just for the noggin.
- Torso: This is where things get interesting! How wide and long do you want your ghost’s body to be? The bigger the torso, the more chicken wire you’ll need.
- Arms and Legs: Each ghostly limb will probably require about 1-2 square feet of chicken wire, depending on how long and flowy you make them.
Choosing Your Chicken Wire:
- Standard Poultry Netting: This is your go-to option, easily found at most stores. It has a 1-inch hexagonal mesh that’s perfect for ghostly forms.
- Wire Gauge: Think of this as the thickness of the wire. Thicker wire (lower gauge number) is sturdier, which is essential for larger, freestanding ghosts.
Pro-Tips for Ghost Wrangling:
- Gather your tools: Wire cutters, pliers, and thick gloves are your best friends when working with chicken wire. Safety first!
- Support from within: If you’re making a large ghost, consider adding internal supports (like PVC pipes or wooden dowels) to help it stand tall and proud.
- Sharp edges = caution: Always wear protective gear to avoid any accidental scratches or pokes.
Remember, it’s all about trial and error! Don’t be afraid to experiment and let your creativity run wild. Happy haunting!
How to Light a Chicken Wire Ghost
Alright, so you’ve got your spooky chicken wire ghost all set up, but something’s missing…the eerie glow! Don’t worry, we’ve got you covered. Let’s dive into some cool ways to illuminate your ghostly creation and really make it pop this Halloween.
Shining a Light on the Options
There are a bunch of different ways to light up a chicken wire ghost, each with its own vibe and level of difficulty. Think of it like choosing the right lighting for a room – you want something that fits the mood!
1. LEDs: The Modern Classic
LED lights are like the superheroes of illumination – energy-efficient, long-lasting, and they come in a gazillion colors! Plus, they don’t produce heat, so no worries about starting a fire.
- How to Use: You can weave LED fairy lights through the chicken wire for a subtle shimmer, or go all out and attach individual LEDs for a more defined, glowing effect. Battery-powered LEDs are perfect for portability, while plug-in ones are great if your ghost has a permanent residence on your porch.
2. Glow Paint: Embrace the Darkness
Remember that gooey, magical paint from your childhood? Well, it’s back and ready to make your ghost the envy of the neighborhood! Glow paint absorbs light during the day and releases it at night, creating a haunting, otherworldly glow.
- How to Use: Grab some glow-in-the-dark paint and get creative! You can paint the entire ghost for a solid glow, or add spooky details like eyes, a mouth, or even ghostly messages. Just remember, the brighter the daytime light it absorbs, the more intense the nighttime glow.
3. Glow Sticks: Quick, Easy, and Disposable
Glow sticks are the party animals of the lighting world – bright, fun, and always up for a good time (even if it’s just hanging out inside a chicken wire ghost).
- How to Use: Simply activate a bunch of glow sticks and then attach them to the inside of your ghost using tape or string. You can even mix and match colors for a funky, psychedelic effect! Just keep in mind that glow sticks have a limited lifespan, so they’re best for shorter events.
4. Black Lights: Unleash the Ultraviolet
Black lights are like the mysterious cousins of regular lights – they emit ultraviolet light that makes certain materials fluoresce, creating a super cool and slightly unnerving effect.
- How to Use: Position a black light near or even inside your ghost. If you really want to up the spooky factor, use white fabric or paint on your ghost – it’ll glow intensely under the black light, creating a truly spectral sight!
A Word of Caution (Because Safety First!)
No matter which lighting method you choose, always be mindful of safety. Keep electrical cords away from little ghouls and goblins, and always follow the manufacturer’s instructions.
The Takeaway: Let Your Ghost Shine!
Lighting your chicken wire ghost is all about having fun and experimenting. There’s no right or wrong way to do it, so let your creativity run wild! Who knows, you might even discover a whole new lighting technique that becomes the next big Halloween trend!
How to Make Chicken Wire Ghost Figures
Ready to transform your home into a ghostly spectacle? Learn to craft seriously spooky chicken wire ghosts to haunt your yard this Halloween!
Gathering Your Ghostbusting Gear:
Before we begin our ghostly endeavor, let’s round up everything we need:
- Chicken wire: This is the backbone of our ghostly friends. You can find it at most hardware stores.
- Wire cutters: These are essential for snipping and shaping the chicken wire.
- Gloves: Protect those hands! Chicken wire can be scratchy.
- Safety glasses: It’s always better to be safe than sorry when flying bits of wire are involved.
- Measuring tape: Helpful for getting the size of your ghost just right.
- Pliers: These come in handy for bending and securing the wire.
- Zip ties or wire: We’ll use these to hold everything together.
- Tomato cage (optional): This can serve as a base for a full-bodied ghost, but feel free to get creative!
- Foam head (optional): Use this as a mold for a more defined head shape.
- Black spray paint (optional): A coat of black paint can give your ghost a more ominous presence.
- Cheesecloth or other fabric: This will give our ghosts that classic, ethereal drape.
- Lighting options (LEDs, glow sticks): Time to make these ghosts glow!
Bringing Your Ghosts to Life: Step-by-Step
Now, let’s get down to the fun part – crafting our spooky friends:
1. Shaping the Head and Torso:
- Start by shaping the chicken wire into the basic form of the head and torso. If you’re using a foam head, simply mold the chicken wire around it.
- No foam head? No problem! You can create a round head by bending a smaller piece of wire into a circle or a more elongated head with a larger piece of wire.
- Secure the shape with zip ties or wire as you go. Remember, ghostly shapes are rarely perfect, so embrace the imperfections!
2. Giving Your Ghosts Arms (and Attitude!):
- Cut two pieces of chicken wire for the arms. The length will depend on how long you envision the arms to be.
- Now, bend the wire to create the arm shapes. Want your ghost throwing spooky hands in the air? Or maybe reaching out for a ghostly hug? Now’s your chance to get creative with the pose!
- Once you’re happy with the arms, attach them to the torso using zip ties or wire.
3. Adding Volume and That Ghostly Drape:
- For a more substantial ghost, consider using a tomato cage as a base. Simply shape the chicken wire around it to create a fuller figure.
- This is where the cheesecloth comes in! Drape it over the chicken wire frame, letting it fall in ghostly folds. Secure the cheesecloth in place with zip ties or wire.
- Feeling bold? Give your ghost a coat of black spray paint. This can create a more striking silhouette, especially at night.
4. Setting the Stage for a Spooktacular Display:
- Choose the perfect spot for your ghostly creation and secure it using stakes or a stand. You don’t want your ghosts flying away with the wind!
- Play around with different poses and experiment with lighting to achieve the perfect level of spookiness. You can place LED lights or glow sticks inside the ghost to give it an eerie glow.
- For a truly haunting effect, try hanging your ghost from a tree or your porch ceiling. The gentle swaying will add an extra layer of spookiness.
Key Takeaways for Aspiring Ghost Makers:
- Making your own chicken wire ghosts is a fun and affordable way to add some personalized spookiness to your Halloween decorations.
- The materials are readily available, and the process allows for endless creativity.
- Feel free to experiment with different shapes, sizes, and poses to create a ghostly gathering that’s uniquely yours.
Remember, the best part about DIY projects is adding your personal touch. So, gather your supplies, unleash your creativity, and get ready to impress your neighbors with your very own ghostly creations this Halloween!
What Is Chicken Wire Disease?
You might have heard the term “chicken wire disease” thrown around, but here’s the catch: it’s not a real disease! It’s more like a nickname people use when their chickens start acting a bit off, kind of like how you might say your computer has a “virus” even if you’re not entirely sure what’s wrong.
Often, what people are actually seeing are signs of other, very real, conditions. Think of it like this: “chicken wire disease” is the symptom, not the cause.
One possibility is a condition called Marek’s disease. This one’s a bit more serious because it’s caused by a highly contagious virus. Marek’s disease primarily affects the chicken’s nervous system, and, sadly, it can be fatal. You might see paralysis, the development of tumors, or, unfortunately, even death in your flock.
Another culprit could be something lacking in their diet. Just like we need our vitamins, chickens need specific nutrients to thrive. If they aren’t getting enough vitamin B1, which is also known as thiamine, or if they have a calcium or vitamin D deficiency, it can lead to problems with their posture.
Then there’s wry neck, sometimes called torticollis. Now, wry neck itself isn’t a disease, but rather a symptom of something else going on. Imagine waking up with a stiff neck – it can be caused by sleeping awkwardly, right? It’s similar for chickens. Wry neck might result from an injury, an infection, or even just their genes.
The takeaway here is simple: if you notice any of your chickens looking a bit wobbly, walking funny, or holding their neck strangely, don’t just brush it off as “chicken wire disease.” It’s always best to play it safe and get in touch with a veterinarian who specializes in poultry. They can figure out what’s really going on and get your feathered friends the help they need.
How Long Does Chicken Wire Last?
So, you’ve got your chicken wire all set for a project, but you’re wondering just how long this stuff actually lasts. Well, you’re not alone! It’s a question many folks ask because nobody wants to be replacing fencing or other structures every other year.
Think of it like this: chicken wire comes in different varieties, just like your favorite pair of shoes. Some are made for tougher conditions than others. Galvanized chicken wire, for instance, is like those heavy-duty boots with extra protection. It’s coated with zinc, which acts like a shield against rust and the elements. This means it’s probably going to hang around for a good while, maybe 5 to 10 years, even more with a bit of TLC.
Then, there’s the non-galvanized kind, more like your everyday sneakers. They do the job, but they’re not as resistant to wear and tear. This type is more prone to rust, especially if it’s constantly exposed to rain or humidity. You’re likely looking at a lifespan of around 2 to 3 years with this one.
But here’s the thing, just like taking care of your shoes can make them last longer, the same goes for chicken wire. Regular checkups are key! Keep an eye out for any signs of damage, like rust spots or broken wires. A little maintenance can go a long way in extending its lifespan.
Now, let’s talk about where you’re putting this chicken wire. Imagine leaving those sneakers out in the sun and rain day after day – they wouldn’t fare so well, would they? Similarly, chicken wire exposed to harsh weather conditions, especially constant moisture and direct sunlight, will deteriorate faster.
Think of it as giving your chicken wire a fighting chance by providing some cover or using it in a more sheltered spot. This will help protect it from the elements and could add a few more years to its life.
Scientists are always looking for ways to make materials stronger and last longer, and chicken wire is no exception. New coatings and materials might be developed in the future that could make chicken wire even more durable. It’s an area of ongoing research!
While we can give you a general idea, remember that these are just estimates. The actual lifespan of your chicken wire can be a bit of a guessing game because so many factors come into play.
The environment, the type of chicken wire you choose, and how well you maintain it, all contribute to how long it will last. But hey, a little knowledge goes a long way, right? You’re now equipped to make the best decision for your chicken wire needs!
How Strong Is Chicken Wire?
Okay, so you’re curious about chicken wire strength. It’s not exactly Superman-level stuff, but it’s surprisingly tough considering how lightweight it is. Think of it like this: its strength really depends on what you want to use it for.
The “gauge” of the wire is the first clue – a lower number means thicker wire, and thicker wire is definitely stronger. Think of it like the difference between string and rope. You wouldn’t want to climb a mountain with string, right? A 19-gauge chicken wire is going to be your workhorse compared to a 23-gauge, which is better suited for lighter tasks.
Next up, let’s talk metal. Most chicken wire is made from galvanized steel because it’s pretty good at fighting off rust. But, if you really want the best protection against the elements (and have a bit more cash to splash), stainless steel is like the superhero of metals in the chicken wire world.
Finally, you’ve got to consider how tightly woven that wire is. A tight weave is like a strong chain – it’s much harder for something to break through. This is particularly important if you’re using it to keep critters in (or out!), as a loose weave might as well be an open invitation!
Think of it like this:
| Factor | What to Look For | Why It Matters |
|---|---|---|
| Gauge | Lower number (e.g., 19) | Thicker wire = tougher barrier |
| Metal Type | Galvanized steel (standard), Stainless steel (premium) | Rust resistance is key, but stainless takes it to the next level |
| Weave Tightness | Tight weave | Fewer gaps mean fewer opportunities for escape (or entry!) |
Now, nobody’s saying that chicken wire is gonna stop a bear dead in its tracks. But for everyday uses like keeping chickens penned in, supporting climbing plants, or even adding a decorative touch to your garden, it’s a surprisingly versatile and strong material. Just remember to choose the right type for the job, and you’ll be golden!
How Much Fabric Do I Need to Make a Ghost?
So, you’ve got the spooky spirit and you’re ready to DIY some ghosts! Figuring out how much fabric you need is probably the first step (unless you’ve already got a sheet running away in fear!). The amount you’ll need can really change depending on what you’re going for. A big ol’ ghost is going to need way more material than a little boo-buddy. The type of fabric plays a role too – some are more stretchy or see-through than others.
How Much Fabric We’re Talking
This is where things get a little “it depends,” but we can totally work with that. Think about these as good starting points:
- Quick and Easy Ghost: For something simple, you’re probably safe with 2 yards of fabric. This is your classic bedsheet ghost.
- Plumper Ghost: Want something with a bit more “oomph”? We’re talking 3-4 yards of fabric for a ghost that’s got some volume.
- Mega Ghost: Alright, you’re going all out! 5-6 yards (or even more!) will be your friend if you’re building a truly monstrous specter.
Remember, these are just estimates. The best way to nail it is to measure your ghost-to-be (or at least have a good idea of its size) and add a few inches for overlap. You don’t want to come up short!
Picking the Right Fabric
- Cheesecloth: This is a classic ghost-making material. It’s lightweight, breathes well (important for those active ghosts), and it’s usually pretty cheap. The downside? It can be delicate and might tear if you’re not careful.
- Muslin: For something a little sturdier than cheesecloth, muslin is a great choice. It’s still lightweight and breathable, but won’t fall apart as easily.
- Old Sheets or Pillowcases: Don’t underestimate the power of a good upcycling! Old sheets or pillowcases work well, especially if you’re going for a classic look. Just make sure they’re clean and preferably white.
But hey, the fun part of DIY is experimenting! You can mix and match fabrics, try different textures, maybe even add some glow-in-the-dark elements! It’s your ghostly vision.
What Size Chicken Wire Should I Use?
Picking the right chicken wire is a big deal for keeping your flock safe and sound. It’s not just about keeping your chickens in, but also about keeping unwanted critters out. So, how do you choose the right stuff?
Let’s break it down:
Think About Those Gaps!
The size of the holes in your chicken wire, what experts call the “mesh size,” is the first thing to consider.
- 1-inch mesh: This is like the standard size, a good fit for most adult chickens. It stops bigger troublemakers like foxes and stray dogs while still letting plenty of air through.
- ½-inch mesh: Got chicks, bantams, or other smaller breeds? This smaller mesh size is a must-have! It keeps those little escape artists where they belong and even helps with smaller pests like weasels and rats. Bonus: it also works great for garden fences to keep out rabbits and other veggie-loving critters.
Strong and Sturdy or Light and Easy?
Next up is the “wire gauge”. This just means how thick the wire itself is. Think of it like this: a lower gauge number means a thicker, stronger wire.
- Lower gauge (thicker wires): These are the heavy-duty option, usually around 19-20 gauge. They cost a bit more, but they’re tougher for predators to bite through or push aside. If you’ve got persistent raccoons or something similar, this is the way to go.
- Higher gauge (thinner wires): On a tighter budget? Higher gauge wire (22-23 gauge) is more affordable. It’s not as strong, so it’s best for temporary setups or areas where you’re not too worried about predators.
But Wait, There’s More!
Picking the perfect chicken wire doesn’t stop there. Here are a few more things to keep in mind:
- Who are your chickens? Different chicken breeds come in different sizes. Make sure the mesh size you choose is right for your flock, especially if you have smaller birds.
- Who are the local troublemakers? Do some research on what kind of predators are common in your area. This can help you decide on the best mesh size and wire gauge for your situation.
- Show me the money! Let’s be real, thicker wire costs more. Factor your budget into your decision.
- Looking good! Chicken wire usually comes in silver (galvanized) or green (PVC-coated). Pick whichever one blends best with your coop and your style!
Choosing the right chicken wire might seem a little overwhelming at first, but trust me, it’s worth it! By thinking about these factors, you’ll find the perfect setup to keep your chickens safe, happy, and out of trouble!
How Deep Should Chicken Wire Be Buried?
So, you’re building a safe haven for your feathered friends and wondering how deep you need to bury that chicken wire to keep out unwanted visitors. While you might have heard 6 inches is enough, let’s just say, that’s not going to cut it for a determined raccoon or a hungry fox.
Think of it this way, digging six inches is like a warm-up jog for those critters. To really make them reconsider their life choices, you need to go deeper. A minimum of 8 inches is a good starting point. Now, if your soil is loose and easy to dig through, like sand at the beach, you’ll want to aim for a solid 12 inches deep. It’s like burying treasure, but instead of gold, you’re protecting your clucking companions!
But wait, there’s more! You can make your coop Fort Knox-level secure with a little trick called horizontal burial. Picture this: after burying the wire vertically, you unfurl it outward from the base of your coop, like a protective skirt, and bury it a few inches under the surface. This creates a digging obstacle course that’ll have those pesky predators saying, “Nope, not worth it.”
Now, chicken wire is great and all, but let’s be real, some critters are practically professional chewers. That’s where the heavy-duty hardware cloth comes in! Think of it as the reinforced steel of the chicken coop world. Laying a sheet of this beneath your chicken wire is like adding an extra layer of armor, making your coop practically impenetrable.
Keep in mind, burying the wire is just the first step in chicken coop security. You’ll want to keep an eye on things, checking for any damage or loose spots. And remember, if you live in an area with a lot of hungry critters, it’s always better to be safe than sorry – go for the deeper burial and stronger reinforcement.
This is all based on what we know now, but researchers are always learning new things about animal behavior. So keep your ears open for any new findings that might help you protect your flock even better! After all, a happy chicken is a safe chicken!
Is Chicken Wire Strong Enough for a Chicken Run?
So, you’re thinking about building a chicken run – that’s awesome! Keeping chickens is a rewarding experience, but you want to make sure they’re safe and sound. We’ve already talked about the importance of a secure run, and now let’s tackle a common question: Is chicken wire actually strong enough to get the job done?
Here’s the thing: while lots of people use chicken wire for their chicken runs, it might not be the most secure option on its own. It’s kind of like using a flimsy screen door to keep out raccoons – they might be deterred, but they could also probably rip right through it if they were determined enough.
Think of it this way: chicken wire has those big, hexagonal gaps, right? And the wire itself is pretty thin and bendable. Well, that means a hungry predator like a raccoon, fox, or even a determined dog could potentially reach right through, push the wire apart, or maybe even tear it. We don’t want that!
What Are the Tougher Alternatives?
Don’t worry, there are some tougher options out there! If you’re looking for materials that can truly stand up to predators, consider these:
- Welded Wire: This stuff is like the muscle car of fencing. It’s made of thicker wire welded together, so it’s much harder to bend or break. Plus, the gaps between the wires are smaller, making it tougher for paws and claws to get a grip.
- Chain Link Fencing: You know that classic diamond-patterned fencing you see around some yards? That’s chain link, and it’s super durable. It’s also a good climber deterrent, which is important if you’ve got foxes or raccoons in your area.
- Hardware Cloth: Now, this stuff is the real deal when it comes to predator-proofing. It’s like chicken wire on steroids – smaller gaps, thicker wire, and way more difficult to penetrate.
Let’s make it crystal clear:
| Material | Strength | Predator Resistance |
|---|---|---|
| Chicken Wire | Low | Low |
| Welded Wire | Medium | Medium |
| Chain Link Fencing | High | High |
| Hardware Cloth | Very High | Very High |
Can I Still Use Chicken Wire Somehow?
If you’re set on using chicken wire, maybe for its affordability or because you like the look, you can beef up its defenses! Here’s how:
- Reinforce with Hardware Cloth: Cover the chicken wire with a layer of hardware cloth, especially in areas where predators are likely to try and break in, like the bottom foot or two of the run.
- Bury It Deep: Predators love a good dig, so bury the bottom of your fencing at least 12-18 inches underground. This makes it way harder for them to tunnel in.
- Secure Those Corners: Those 90-degree angles are weak points! Reinforce them with extra hardware cloth or even some sturdy wooden posts.
- Motion-Activated Deterrents: Scare those pesky critters away with motion-activated lights or sprinklers! Nothing ruins a midnight snack like a sudden burst of water.
The Takeaway
The safety of your flock is paramount. While chicken wire might seem like the go-to choice, remember it’s designed to keep chickens in, not necessarily predators out. By choosing stronger materials or reinforcing chicken wire, you’re creating a haven where your chickens can thrive!
Are you a fan of cult classics? Then you don’t want to miss out on The Room Movie, a cinematic masterpiece that has been leaving audiences bewildered and in stitches since its release.
Need a deep dive into the world of online dating and its unfathomable mysteries? Look no further than the compelling documentary Nev Schulman that follows the story of a man who finds himself caught in a whirlwind of catfishing and deception.
Prepare to be whisked away to a tropical paradise with Lilo And Stitch, an enchanting animated film that will melt your heart and ignite your imagination.


